|
 Directions for Clock Project (both sizes) / December 1999
Step 1. Download, then print the templates for the Large
or the Small sizes.
These are .pdf files, and require Adobe Acrobat Reader software
in order to view and print (for other languages, see below.) Adobe
Acrobat Reader Software is available for free download at Adobe
Online.
To insure printing in exact size, be sure that
FIT TO PAGE (see Properties under the Print Menu) is not selected.
If you are a do-it-yourselfer, and want to digitize your own version of
the clockface, print out the template and scan the printed sheet into your
design software. Then digitize the design as you want it, and save it with
a file name of your choice.
If you are using the pre-digitized designs, the template is still useful,
since it locates the trim outside edge with a dotted line, as well as the
location and size of the hole that will need to be drilled in the plastic
frame (see Step 6).
Step 2. Purchase pre-digitized designs (do-it-yourself users - skip this
step).
If you are using the pre-digitized clockface designs, purchase and download
the design.
It will be received as a self-extracting zip file (.exe), with the following
product numbers:
99846 - Clock (large). The sewn image of the clockface is 4 1/4" (108mm)
wide by 6 1/4" (158mm) high, and is designed for larger hoops
99847 - Clock (small). The sewn image of the clockface is 3" (74mm) wide
by 3 9/16" (90mm) high, and is designed for smaller hoops.
Locate the file in your Downloads folder and double-click on the icon, which
will appear as a small blue rectangle. The files will automatically unzip.
Each product contains three variations of the outline border, identified
as Clock011, Clock012, and Clock013 for the Large size and Clock021, Clock022,
and Clock023 for the Small size.
Each product also contains a .txt file that can be read or printed, called
"Notes". This file contains information about the number of stitches in the
design, the sewing sequence of the various parts of the design, and suggested
thread colors.
The thread colors are just suggestions. Feel free to experiment with different
thread colors.
The product file for each size contains the files in 7 different formats:
.csd Singer / P.O.E.M
.dst Tajima
.exp Melco expanded
.hus Husqvarna Viking
.pcs Pfaff
.pes Brother, Babylock, Bernina
.sew Janome/New Home, Elna
Choose the appropriate format, and discard the rest.
Import the Clock design of your choice into your design software.
Step 3. Merge a letter or letters from the Monogram Set of your choice.
Both the large and small Clock faces have an open space at the top to insert
the letter design(s) between the top of the triangle demarking the 12 o’clock
position and the outside decorative border.
Choose one or more letters, and move them as required until you are happy
with the overall design. (Note: for more information on how to import and
merge designs together, consult your embroidery design software Help files.)
When you are happy with the overall design, save the file with a filename
of your choice.
Step 4. Sew out the completed clock design.
Although the ultimate choice of fabric is yours, we recommend felt as the
best fabric for this project because it comes in several colors, is easy to
acquire in small quantities, and when trimmed has a finished edge that will
not unravel.
We also recommend that the felt be stabilized with one layer of iron-on
backing, which will create a continuous backing surface that is attached to
the felt, making trimming the edge easier.
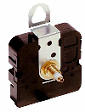
Step 5. Collect the parts of the clock.
In addition to the sewn clockface design, you will need the following:
1. Plastic picture frame, either 5" (12.7 cm) x 7" (17.8cm) for the Large clock,
or 3 1/2" (8.9cm) x 5" (12.7 cm) for the Small clock.
This type of frame is molded from one piece of plastic, with an angled
foot for support. It is designed for a photograph to be slid between
the two layers of plastic. (Note: most versions of the small size frame
that we have seen come with a rear surface that is shorter than the front
surface, while most of the larger size frames have a rear surface that
is the same size as the front. The layout of the small clockface design
takes this into consideration.)
2. Quartz clock movement, battery operated, with stamped metal hour
and minute hands. A sweep second hand is optional. Both the
Large and Small sizes use the same clock mechanism.
(See the list of supply sources at the end of these instructions.)
Step 6. Drill a hole in the plastic frame.
Both sizes of this project utilize an inexpensive plastic picture frame,
with a one-piece molded foot.
In order to turn this picture frame into a clock, a hole will need to be drilled
in the frame to allow the shaft of the clock mechanism to pass through from the
rear
A 5/16� (8mm) hole needs to be drilled. Use the printed template described
in Step 1 to locate where the hole should be drilled.
We recommend that you mark the spot with a permanent marker. In order to drill
the hole without shattering the plastic, clamp a piece of wood onto the back of
the frame, place the wood flat on a work surface, and drill the hole without excess
pressure. If you have a drill with variable speeds, use a speed just below maximum.
Step 7. Final assembly.
Trim the sewn clock face to the correct size, using the dotted line on
the template for reference.
Make a circular cutout in the fabric for the clock shaft to pass through
with an exacto knife or small sharp scissors.
Slide the sewn clockface between the two layers of plastic and align the
holes.
Insert the clock mechanism through the hole from the rear, and hold in
place by attaching the nut and washer supplied with the clock mechanism.
Attach the clock hands.
Insert the AA battery.
Congratulations! Your project is complete.
Sources for Materials
Plastic Frames:
These frames are quite common, and can be found in craft stores, photo
shops, office supply stores, pharmacies, etc.
Felt and iron-on backing:
Available from fabric or craft stores.
Clock Mechanism:
Small battery-operated quartz clock movements can often be found in craft
stores sold as kits. In addition, stores that sell finished clocks often sell
these clock parts individually.
The clock movement for this project is 2 1/8" (5.3 cm) square and 9/16"
(1.5cm) thick, with a slot for one AA battery on the back.
This type of clock movement is manufactured with several choices of threaded
shaft length, and comes with a locking nut and washer, along with a screw-on
cap to hold the minute hand in place. The hour hand is pressure-fitted on
the teflon section of the shaft.
While a clock mechanism that comes as a kit will include hands, there are
more choices of style and size for the hands if they are purchased separately.
This project requires a clock mechanism with a threaded shaft length of
5/16" (8mm). While there are several hand styles available, the length of
the minute hand should be 1 1/2" (38mm) or 1 3/8" (35mm) long.
Sources for clock mechanism on the Internet:
1. In the US, Bradco Enterprises has a website, with secure online ordering,
for clock movements and hands as separate purchases.
For clock movements, go to:
http://www.bradcoent.com/storefront/cgi/goto.cgi?FILE=bradco/takane.html
The correct item is # 0021 (5/16")
For hands, go to:
http://www.bradcoent.com/storefront/cgi/goto.cgi?FILE=bradco/hand.html
The recommended item #103 (1 1/2")
2. In Canada, Craftime Clockery in Elmira, Ontario has a website. Their
website does not currently have online ordering, but does picture their products.
They take telephone orders (Visa and MasterCard).
For clock movements, go to:
http://www.imagitek.com/clock/cmove.html
The correct item is model # 8076 (5/16")
For hands, go to:
http://www.imagitek.com/clock/hand.html
The recommended item is # 1093 (1 3/8")
3. In the UK, Europe, etc. M& P International has a website. Their
website does not currently have online ordering, but does have drawings of
their products. They do worldwide mail-order, and can be contacted by email
through their website, or by phone.
For clock movements go to:
http://www.m-p.co.uk/medpass/cate/chap04/sx040001.htm
The correct item is # 0473 000115.
For hands, go to:
http://www.m-p.co.uk/medpass/cate/chap06/sx060002.htm
The recommended item is # 0348 002515
|